How to Install a Gravel Driveway?
Gravel driveways are one of the most popular driveway options in the UK. They offer affordability, versatility, and a natural, classic look. A well-installed gravel driveway not only improves the aesthetic appeal of your property but also provides a durable, low-maintenance surface suitable for vehicles of all sizes. At Driveways Weymouth, we specialise in installing bespoke gravel driveways that are built to last. This guide will take you through every aspect of gravel driveway installation, from planning and preparation to maintenance and long-term care.
Why Choose a Gravel Driveway?
Gravel driveways have been a favourite in the UK for decades, and for good reasons:
- Cost-effective – Gravel is generally cheaper than block paving or concrete.
- Versatile design options – Available in various colours, textures, and sizes to match any home style.
- Excellent drainage – Gravel allows water to percolate naturally, reducing puddles and potential flooding.
- Low maintenance – Easy to repair, top up, or reshape over time.
- Eco-friendly – Permeable surface reduces runoff, supporting sustainable drainage.
Despite its simplicity, gravel driveways require careful installation. Without proper groundwork, gravel can sink, shift, or cause drainage issues over time.
Step 1: Planning Your Gravel Driveway
The planning phase ensures the driveway is functional, visually appealing, and long-lasting. Key considerations include:
- Dimensions and layout – Measure your property accurately. Include turning areas if multiple cars will use the driveway.
- Shape – Straight driveways are easier to construct, while curves can add character but require precise grading.
- Access points – Ensure smooth entry and exit for vehicles.
- Edging – Decide on timber, stone, concrete, or metal to contain gravel and enhance aesthetics.
- Slope and drainage – Incorporate a slight gradient (1–2%) for water runoff.
Planning reduces the likelihood of costly mistakes and ensures you order the correct quantity of materials.
Step 2: Site Preparation
Site preparation is the most critical step and ensures your driveway is stable and level. Steps include:
- Clear the area – Remove grass, shrubs, roots, and any existing surfaces such as tarmac or old paving.
- Excavate – Dig to a depth of 150–250mm depending on soil type, gravel thickness, and expected traffic. Heavier clay soils may require a deeper base.
- Level the ground – Check that the surface follows the desired gradient for drainage.
- Compact the subsoil – Using a mechanical compactor, stabilise the ground to prevent sinking.
Proper site preparation prevents long-term issues such as potholes, uneven surfaces, and gravel displacement.
Step 3: Choosing Materials
Gravel Types
- Crushed stone – Angular stones lock together well and create a stable surface.
- Rounded gravel – Smooth, easier to drive on, and comfortable for walking.
- Pea gravel – Small, rounded stones often used as a decorative top layer.
Sub-base Materials
- Crushed hardcore or MOT Type 1 – Provides structural stability.
- Sand layer – Optional fine layer to level the sub-base.
Edging Options
- Timber sleepers – Natural look, easy to install.
- Stone or brick – Durable and decorative.
- Concrete or metal – Long-lasting and low-maintenance.
Selecting the right materials is key to achieving a durable, attractive driveway.
Step 4: Laying the Sub-Base
A strong sub-base prevents the gravel from sinking into the soil:
- Spread crushed stone or hardcore (100–150mm thick).
- Compact thoroughly using a mechanical plate compactor.
- Ensure it follows the slope for proper drainage.
A robust sub-base is essential for driveways used by cars or larger vehicles.
Step 5: Installing a Geotextile Membrane
Adding a geotextile membrane between the sub-base and gravel offers several benefits:
- Prevents weeds from growing through the driveway.
- Stops gravel from mixing with the soil.
- Improves drainage and prevents gravel movement.
Though optional, it significantly increases the longevity of your driveway.
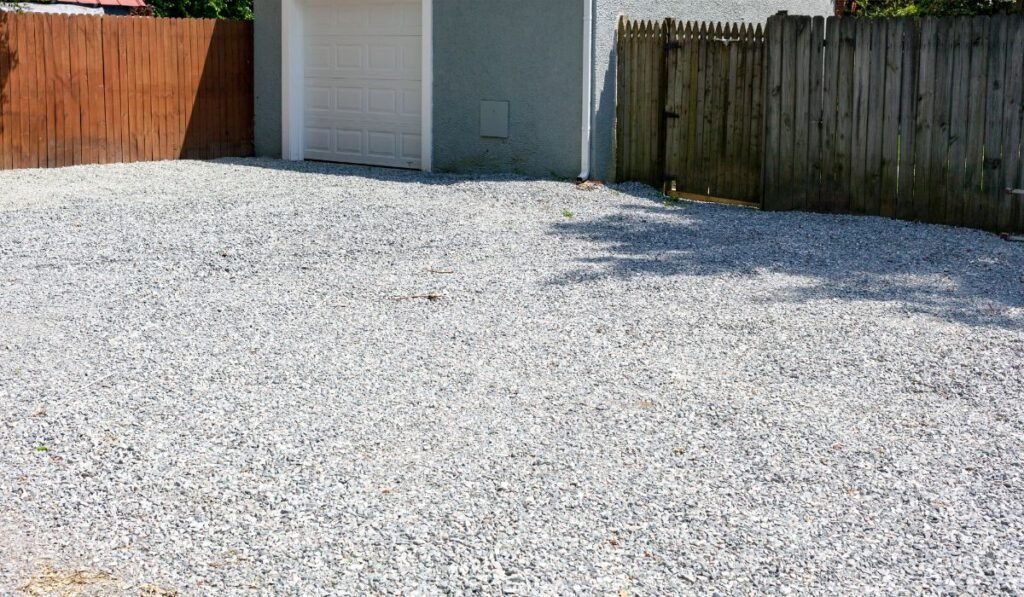
Step 6: Spreading Gravel
- Base layer – Start with larger gravel stones for stability.
- Top layer – Add decorative gravel for a smooth, attractive finish.
- Even spreading – Use a rake to distribute the gravel uniformly.
- Light compaction – Compact lightly with a hand tamper or plate compactor to stabilise the surface.
Layering and compaction prevent uneven areas, sinking, and loose stones.
Step 7: Edging Installation
Edging keeps the gravel contained and maintains a tidy appearance:
- Secure edging firmly to prevent gravel spilling onto adjacent areas.
- Use timber, brick, stone, or metal depending on your preference.
- Proper edging also simplifies maintenance and enhances visual appeal.
Step 8: Final Checks
Before using your driveway:
- Ensure water flows away naturally to avoid puddles.
- Check gravel depth and top up if necessary.
- Inspect the edges for stability.
Step 9: Maintenance Tips
Gravel driveways are low maintenance, but regular care ensures longevity:
- Rake regularly – Redistribute gravel to maintain a level surface.
- Top up gravel – Add new gravel every 2–3 years.
- Weed control – Remove weeds manually or apply weed killer.
- Check drainage – Ensure the driveway continues to slope correctly.
- Secure edging – Repair edging as needed to contain gravel.
DIY vs Professional Installation
While DIY gravel driveways are possible for smaller projects, professional installation offers:
- Accurate site preparation and compaction
- Proper sub-base construction for long-term stability
- Correct drainage and gradient planning
- Expert material selection and layering
- Reduced risk of common issues like sinking or gravel displacement
At Driveways Weymouth, our team ensures your driveway meets both functional and aesthetic requirements.
Cost Considerations
Several factors affect the cost of a gravel driveway:
- Size of driveway – Larger areas require more gravel and materials.
- Type of gravel – Decorative or premium gravel is more expensive.
- Edging material – Timber is cheaper than stone or concrete.
- Groundwork requirements – Clay soil or uneven terrain may require extra excavation or drainage.
Professional installation may seem more expensive upfront, but it saves money by preventing repairs and maintenance issues in the future.
Seasonal Considerations
- Winter – Avoid installing gravel during heavy rain or frost; it can make excavation difficult and affect compaction.
- Spring/Summer – Ideal time for installation due to dry, stable ground.
- Maintenance – Gravel may need raking and topping up after winter due to frost heave or water movement.
Common Mistakes to Avoid
- Skipping the sub-base – Leads to sinking and uneven surfaces.
- Ignoring drainage – Causes puddles and erosion.
- Using the wrong gravel – Small or rounded gravel may shift excessively.
- Poor edging – Gravel spreads into adjacent areas without containment.
- Not compacting layers – Reduces stability and longevity.
Professional installation ensures these mistakes are avoided.
Why Choose Driveways Weymouth
At Driveways Weymouth, we provide:
- Bespoke driveway design to suit any property style
- Expert site preparation and sub-base installation
- Layered gravel installation for both stability and aesthetic appeal
- Secure and decorative edging
- Long-lasting driveways that can withstand UK weather conditions
Our experienced team ensures your gravel driveway is both functional and visually stunning.
Final Thoughts
A gravel driveway is an excellent choice for UK homeowners seeking a balance of durability, affordability, and visual appeal. Proper planning, high-quality materials, thorough site preparation, and professional installation are key to creating a driveway that lasts for decades.
For residents in Weymouth and surrounding areas, Driveways Weymouth offers complete gravel driveway services from design to installation and maintenance. Contact us today to get started on your dream driveway.